Table of Contents
- Unlisted shorter pages
- Non-GF Content
- Video Guides
- Rare Fairy Crafting Strategies
- Target Practice Dummy Effective HP
- Stage CE/EXP cap correlation
- Energy Gem Efficiency
- Coalition Unit size distribution
- Coalition Drill: Decoding Practice rates
- Additional SMG equipment charts
- Crafting Shotguns
- Popular friend echelon dolls
- Fairy aura/skill DPS spreadsheet
- Secret videos
- Data sim distances
- Rows & Columns
- Equipment calibration pity
- Damage Variance Distribution
Unlisted shorter pages#
- G41 vs G41
- M16 Analysis
- Testing SF I
- Enemy ID Collection
- Night Equipment: M4A1
- Estimating Witch's Active
- Login SPEQs: does X new equipment revolutionize the role of irrelevant doll #8?
Non-GF Content#
Video Guides#
Missed some login dolls way back when the game launched? Heard Super SASS has a neural upgrade in the future? Interested in Type 59 accuracy memes?
Here're the routes I used to farm all the limited dolls in Arctic Warfare, done in an era where we have Parachute fairies, M4 mod, M1911 mod, and so on. I tried to get them as AFK as possible, though feel free to contact me if you know a better way.
(2021-01-06) And here are my routes for Cube. E1-3 is almost entirely auto, while E1-4 is almost entirely manual. E1-2 is somewhat farmable, but E1-3 has more dolls available, can get more checks, and is more auto-friendly.
(2020-11-17) Continuum Turbulence is now permanently available! Get your Pythons today with this handy double drag. It has 4 checks per run, is resource efficient, and is 100% consistent.
Requirements: 4 strong RFs, 3* statstick fairy, 3 HGs with good tiles. Can grind out levels 90-100 on some of your dolls here too.
Rare Fairy Crafting Strategies#
Switch tabs to view rateup/non-rateup calculations.Disclaimer: if you want to obtain a Parachute fairy, craft 2000/500/2000/1000 tier 1 or 2 for the best rate. If you need to star up your base fairies, craft lots of 500x4 tier 1. This is aimed towards efficiently enhancing the rarity of your parachute or other expensive recipe fairies.
The colored cells contain different value metrics of each recipe, with dark green being the most efficient in that column and bright yellow least efficient.
What resource each commander is limited by will vary wildly, so I included several different ways to measure the value of each recipe. Feel free to download/copy the sheet and edit the weightings to your liking.
Overall, 2/5/2/1 tier 1 or 2 and 500x4 look to be strong options for raising parachute fairies specifically - 500x4 for pure resource efficiency, and the expensive recipe to save on cores/contracts.
Once you add other expensive fairies into the mix, 2/2/2/1 does quite well. Upping the parts to 2000 barely helps, decreasing overall resource efficiency. 2/5/2/1 also has pretty high numbers, but it doesn't actually help with raising some of the interesting expensive fairies like combo or landmine. Despite its excellent value with raising just one expensive fairy (parachute), 500x4 falls behind on resource efficiency as you try to raise a range of expensive fairies.
Also of interest: comparing rateup rates to the rates just before, all recipes see a 30-40% increase in total fairy rate. This isn't as good as the 100%+ boost observed in the general doll rateup, but it's certainly not a complete scam and a fair bit higher than the rates described in this post from a while back.
Enhancement costs, shared talents, and standard pool fairy XP are not accounted for here. Future rates may vary.
Target Practice Dummy Effective HP#
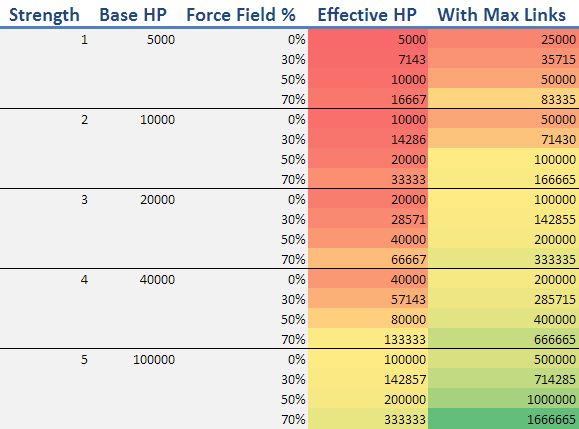
Setting different levels of force field let you effectively get different amounts of HP compared to the Strength 1-5 settings. Here's all those combinations. See this article for more on the target practice dummy. It should go without saying, but the forcefield settings don't work for this purpose if you use HOCs.
Stage CE/EXP cap correlation#
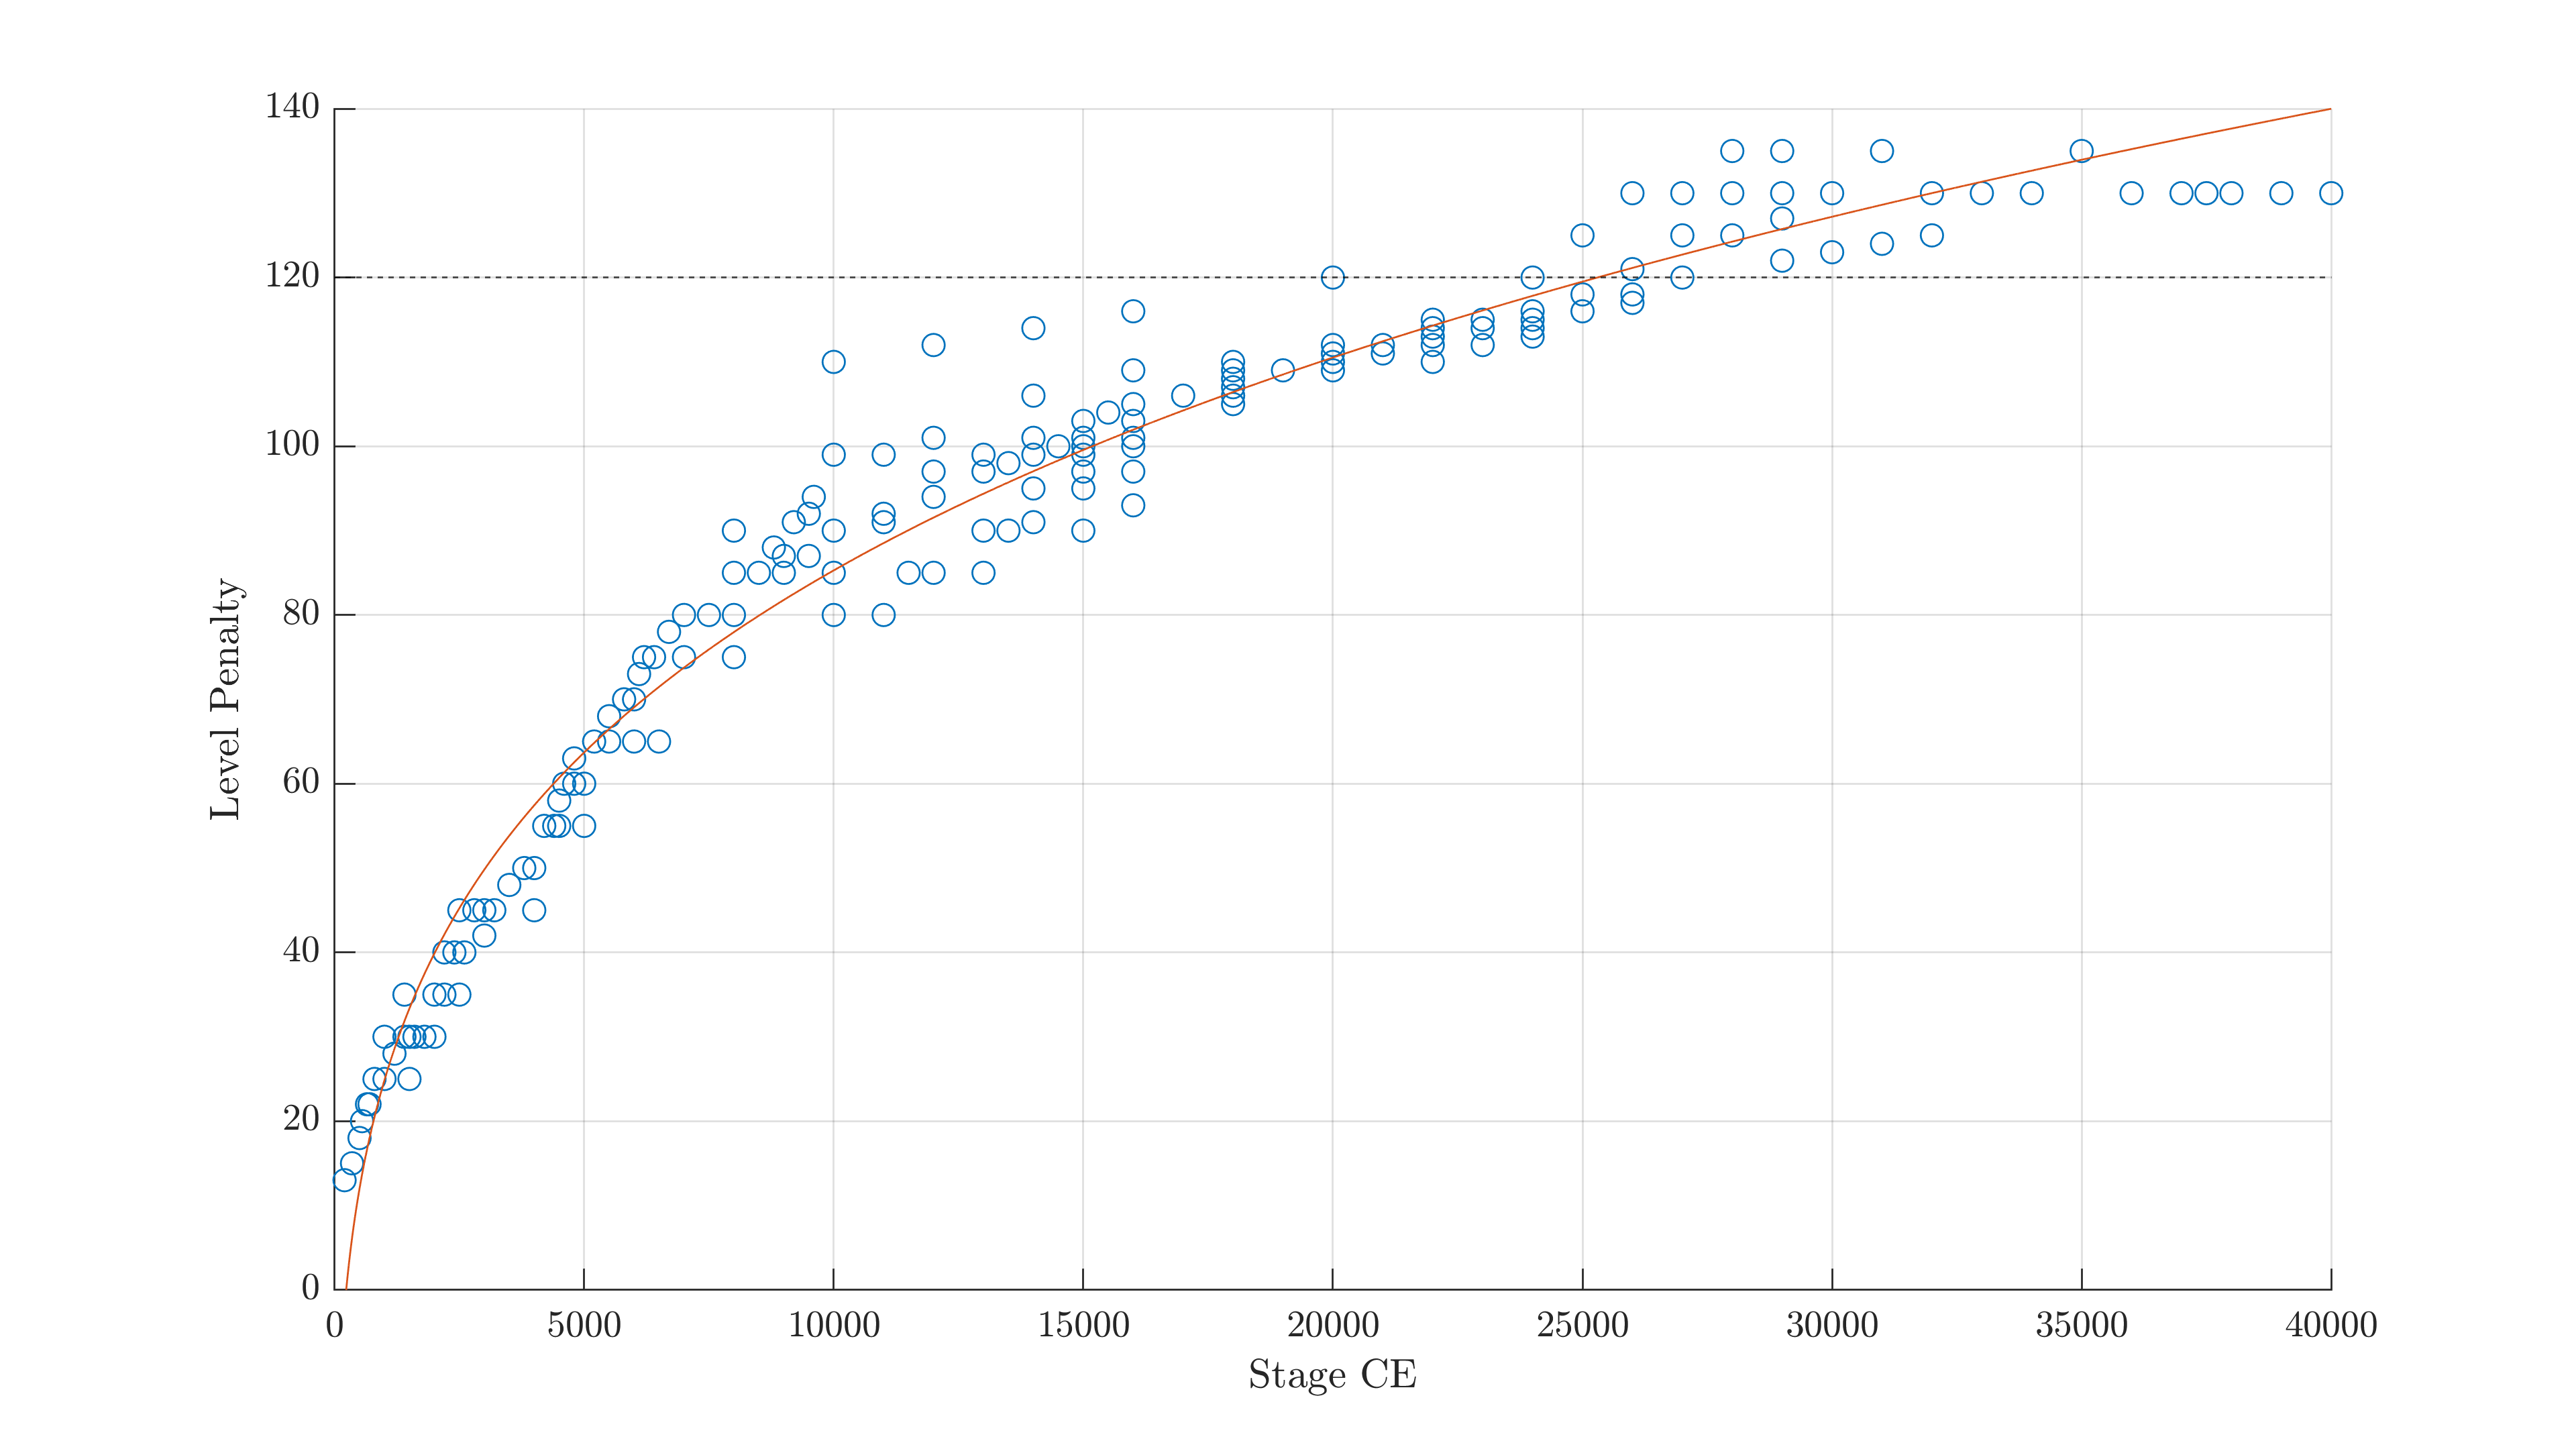
While the level caps and CE ratings of a stage have no inherent need to relate, there is a strong positive correlation between them. Once you get past ~17000 CE, all stages recorded have caps above level 100. To go all the way up to level 120, you'll want to start looking at 25000+ CE maps (or just grind 12-4E).
Level penalty numbers taken from /u/UnironicWeeabo's autobattle chart. This includes campaign stages up to Singularity. Why do some levels have caps above 120? We may never know.
Energy Gem Efficiency#
This has moved! Click here for the new page.
This page evaluates most energy-related packages (offering data/memory fragments/calibration tickets/SF capture resources), real-money packages, and Aid Commission options.
Coalition Unit size distribution#
This has moved! Click here for the new page.
Coalition Drill: Decoding Practice rates#
This has moved! Click here for the new page.
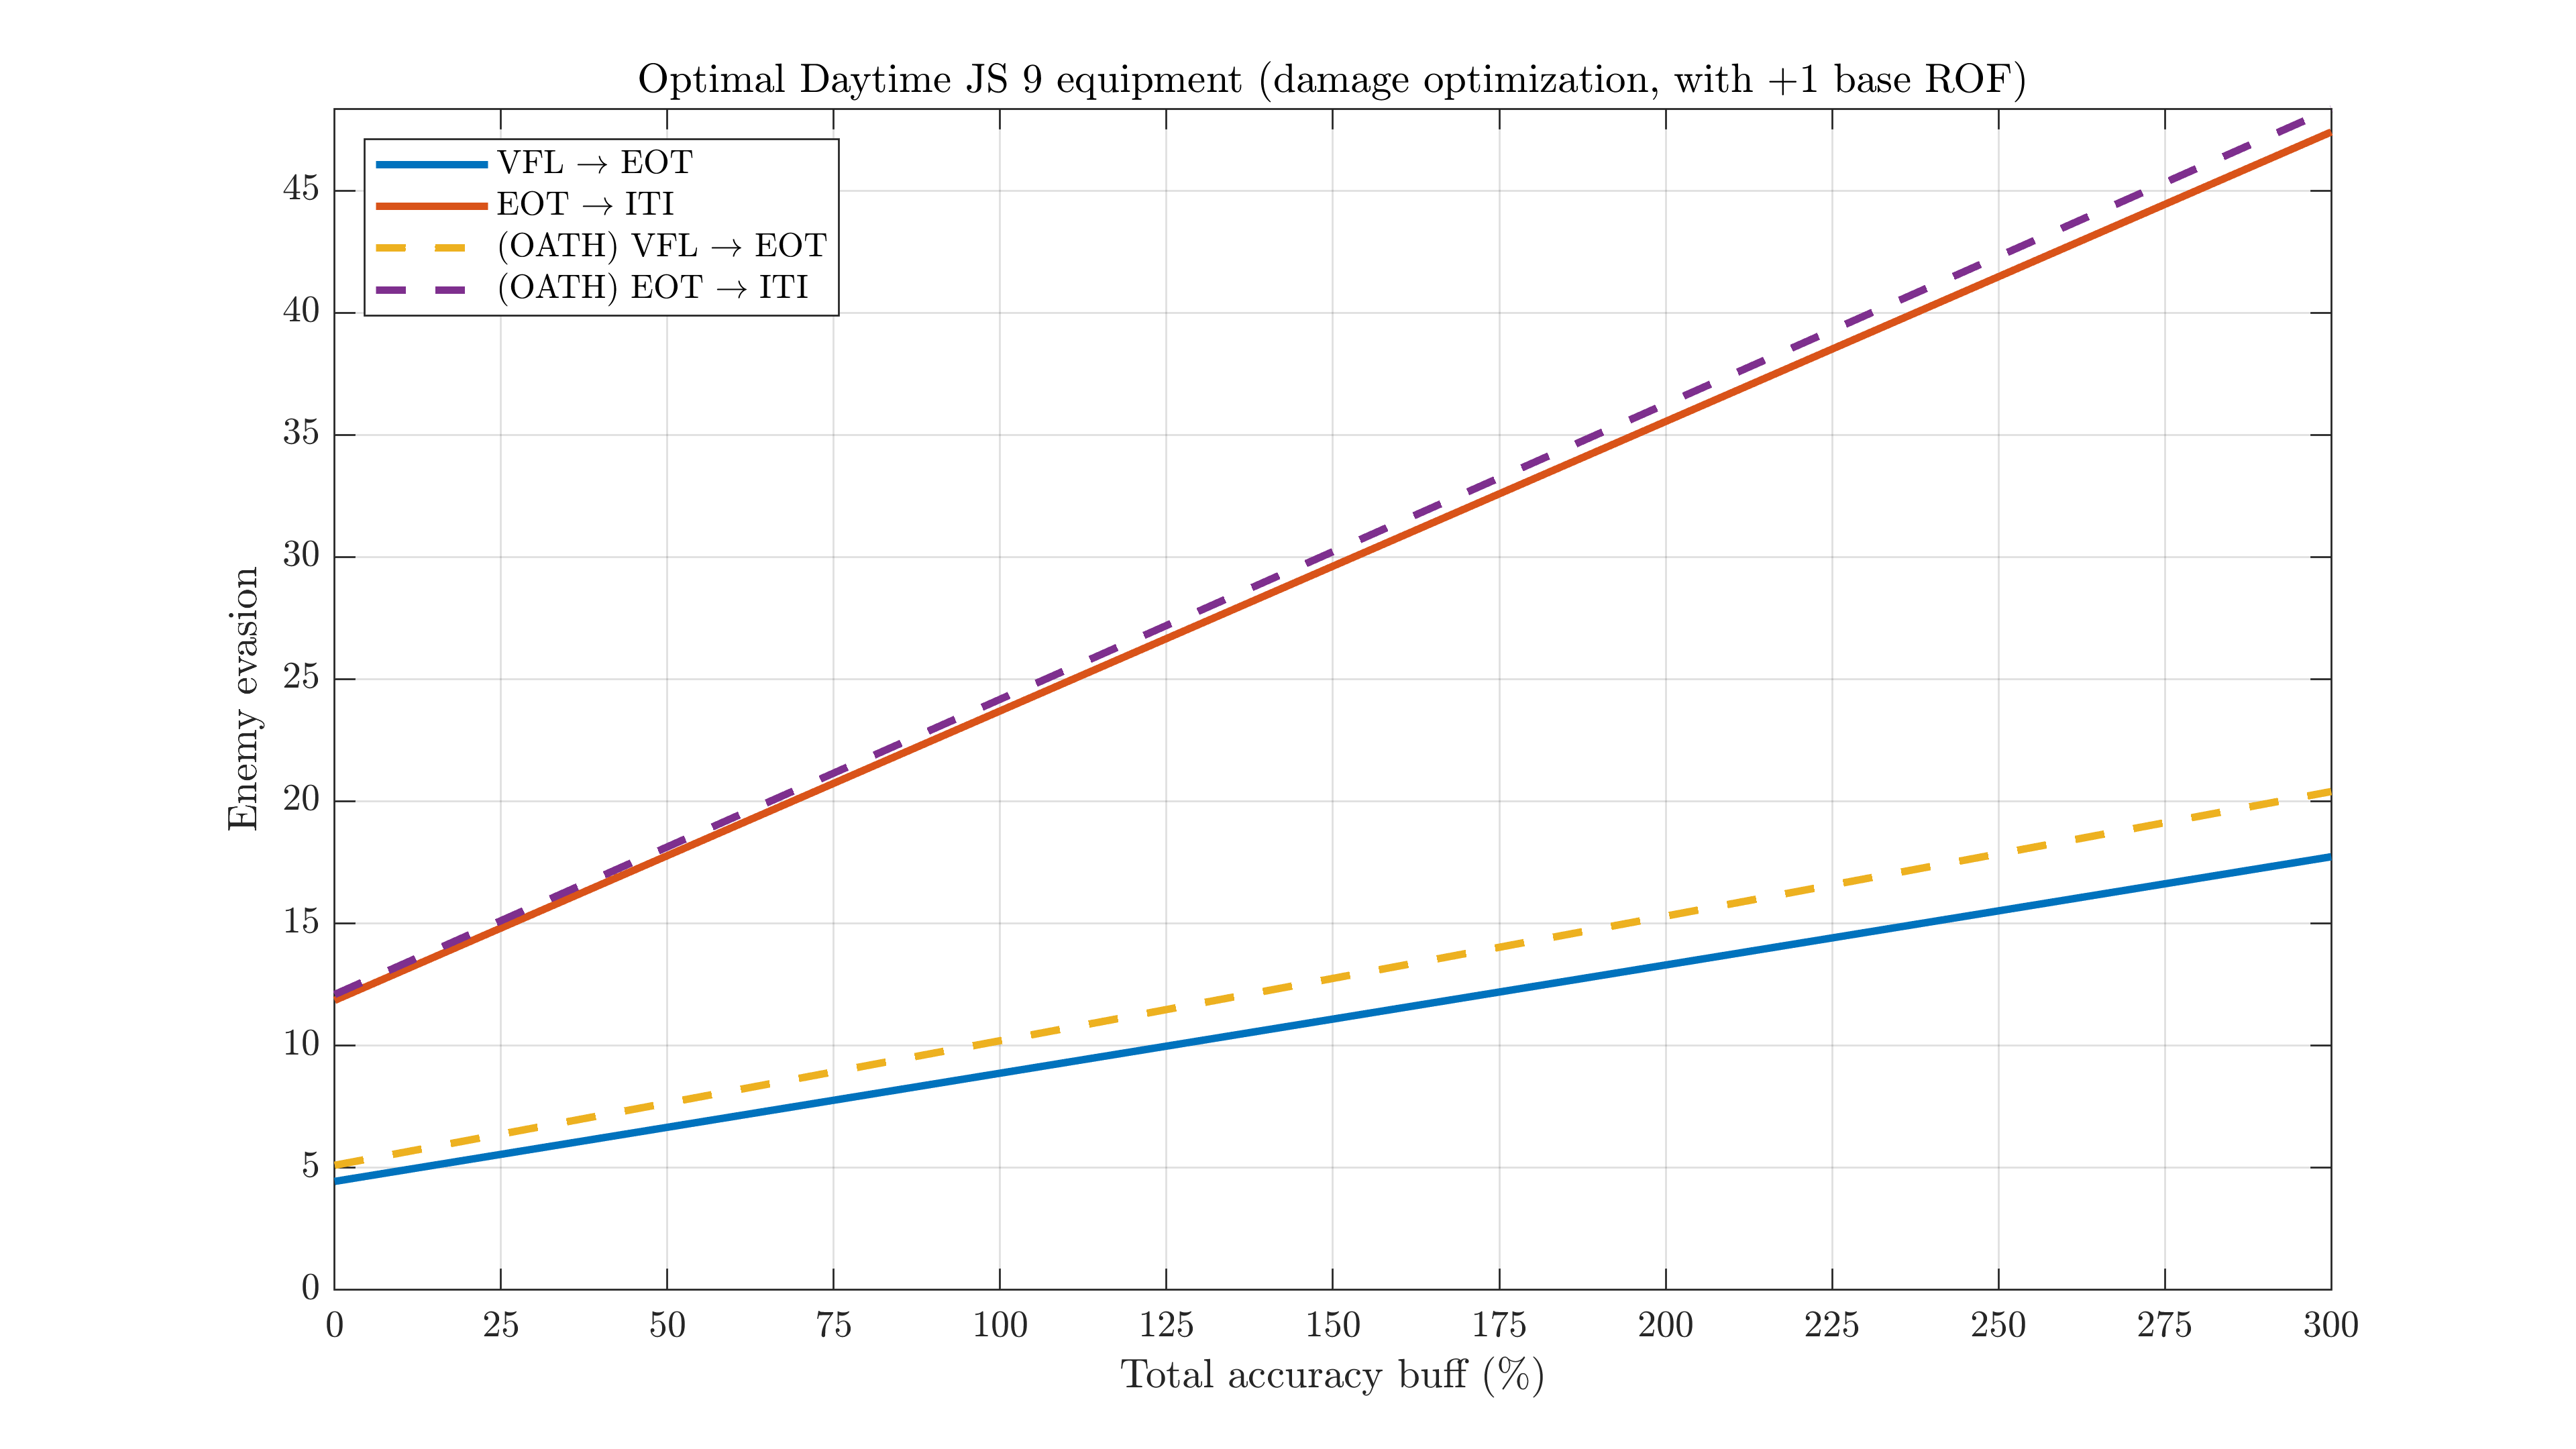
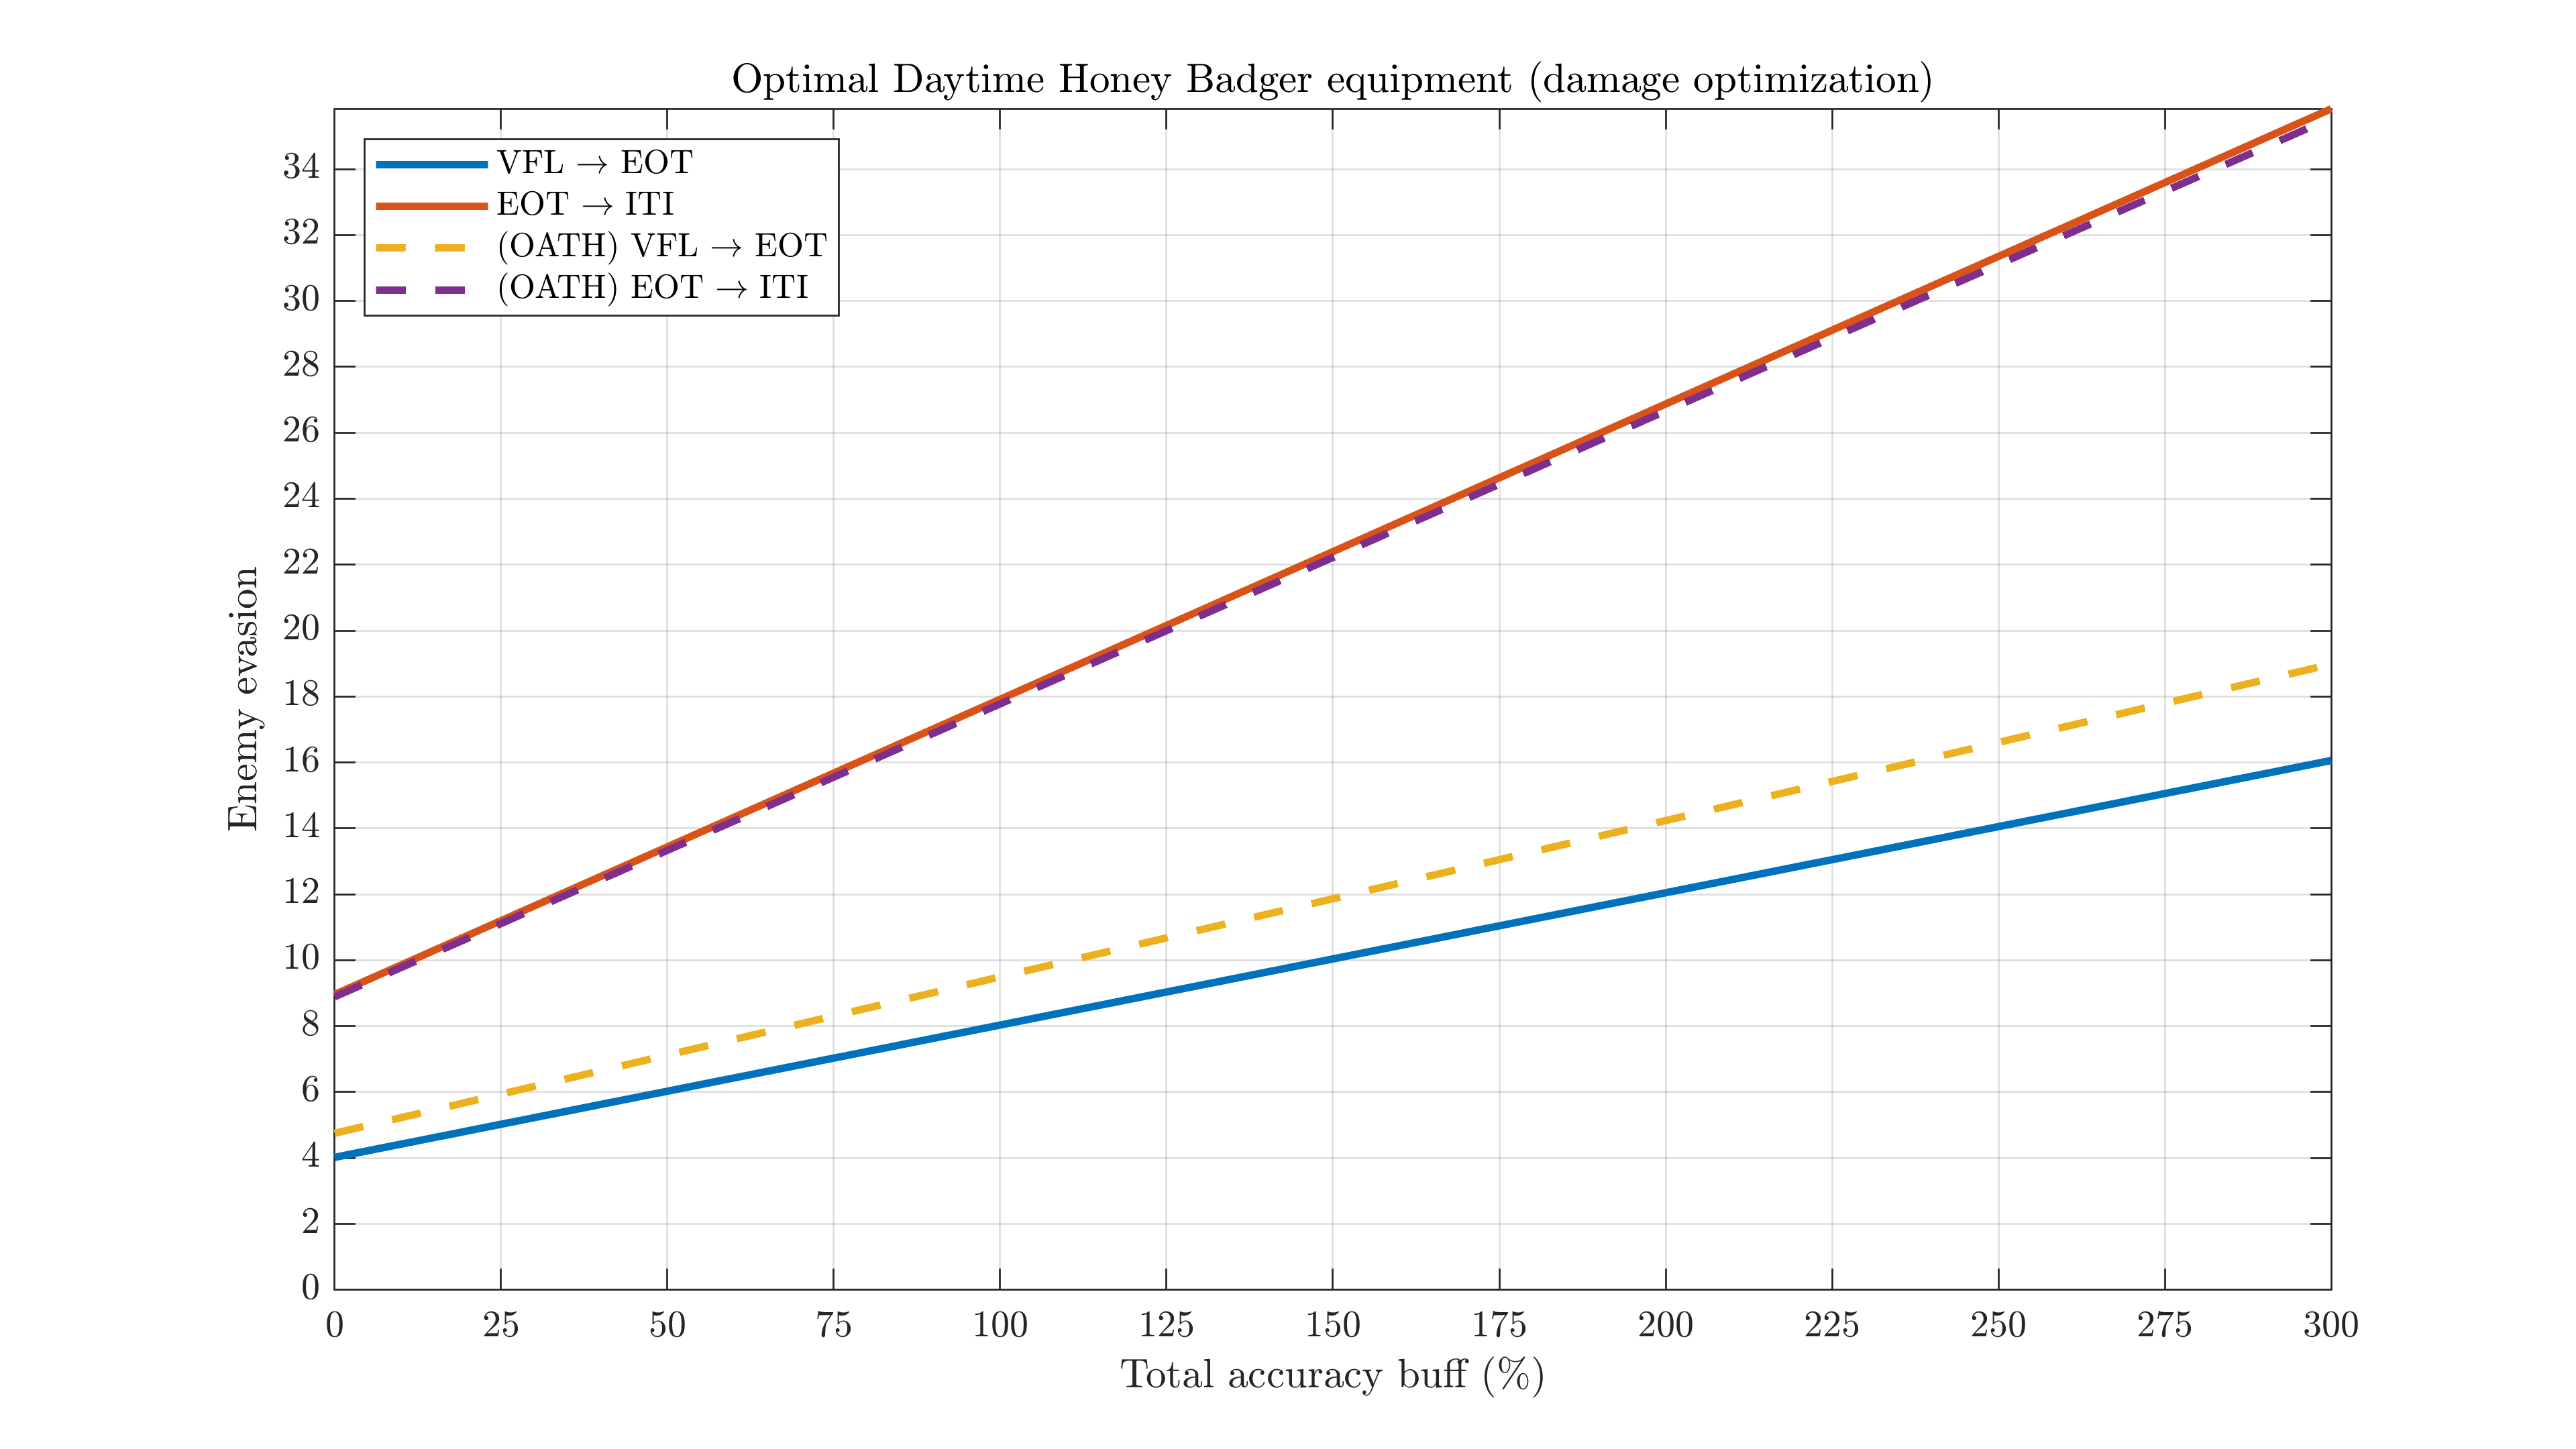
Additional SMG equipment charts#
See Shrimp's and X95's articles for reference on what this is all about. For some other popular shooty offtanks, see below:

Note that, because JS 9 sits right above a frame breakpoint, ITIs slow her down and perform much worse on her. The impact of this will lessen if she has ROF buffs that move her away from a breakpoint: for example, here's her chart with just +1 base ROF across the board.
ARs/RFs don't need the same type of chart as they have much higher base accuracy - you just always use crit scopes. If you're curious how the numbers work out there, see this earlier writeup of mine on AR equipment.
Crafting Shotguns#
Due to the extremely high cost of crafting and niche uses, shotguns are a popular pick for each major event's True Core mask. These aren't always available and don't work on 3 or 4-star dolls, so you may still want to do some heavy doll production. I recommend avoiding it as much as possible, but here are some things to consider when picking your recipe.
Question 1: is 6/1/6/4 or 8/1/8/4 better? Let's look at some recent data (taken before LTLX batch) and compare:
| Recipe | 5* SG rate | 4* SG rate | 3* SG rate | Total SG rate |
|---|---|---|---|---|
| 8/1/8/4 T1 | 9.84% | 24.36% | 17.17% | 51.33% |
| 6/1/6/4 T1 | 6.68% | 16.35% | 12.04% | 35.07% |
8/1/8/4 has higher rates across the board, but we also have to factor in its increased cost - valuing parts 3x other resources, it has a total weighted resource cost of 29000 vs 6/1/6/4's 25000. Let's divide the above table by those costs to find the effective number of shotguns per 1M resources spent:
| Recipe | 5* SGs/1M rsc | 4* SGs/1M rsc | 3* SGs/1M rsc | Total SGs/1M rsc |
|---|---|---|---|---|
| 8/1/8/4 T1 | 3.39 | 8.40 | 5.91 | 17.70 |
| 6/1/6/4 T1 | 2.67 | 6.54 | 4.82 | 14.03 |
So 8/1/8/4 is more resource-efficient no matter what rarity of shotgun you're going for.
Now that we know the recipe to use, let's see if increasing the tier is worth it (data source).
| Tier | 5* SG rate | 4* SG rate | 3* SG rate |
|---|---|---|---|
| 1 | 9.72% | 24.68% | 16.88% |
| 2 | 12.31%+26% | 29.98%+21% | 9.18%-46% |
| 3 | 14.87%+21% | 37.54%+25% | 0%-100% |
It's much harder to recommend a specific tier here as it will depend on how many resources/contracts/cores you have and which dolls you need. Higher tiers are bad if you still need a 3* SG, especially at tier 3 where they cannot drop at all. Otherwise, they offer a potentially worthwhile increase in 4/5* SG rates and older players may have lots of T-Doll contracts to spare for that. Superscripts are the relative change from the previous tier.
Rates for non-SG dolls are not noted because you should never be doing heavy production for those.
Popular friend echelon dolls#

A few charts on the dolls used in my friends' friend echelons, as of 2021-September-22. For more commentary see here.
Fairy aura/skill DPS spreadsheet#
Ever wondered how important the accuracy on Warrior was? How valuable the crit damage of Fury is on an ARSMG? Here's a spreadsheet comparing the DPS increase each fairy gives, under various conditions. Make a copy or download it to customize your accuracy, evasion, crit rate, crit damage, and various fairy-specific settings.
Note: this assumes 5-star fairies. You can add lower-rarity aura values on the fairy stats tab.
Secret Videos#
That is, various unlisted videos of mine. Mostly quick clips and gameplay demonstrations.
- 10-6 Judge kill with M4A1 cannon.
- 12-4E drag demo with KSVK+Beach, and the same except with a SL1 Sehra & Nina (it's not a very good idea either way).
- Map-layer demonstration of a 5-2N clear using no friend echelons (but 4 combat+1 dummy of my own).
- My 10.57s submission for the Grape Juiced speedrun. I swear the skill cut-ins help with timing.
- "Another Nightmare" - a demonstration of a low-spec clear for the Another Dream speedrun.
- An alternative farming route in AW using E3-4, best if you don't have a para to do E1-4 and want one of those dolls.
- A collection of example fights from most of the harder zones in Theater 3/4.
- Low-cost (but not low-requirement) clears of 4-6 and 5-6 (see also: community story map farming speedrun submissions)
- Some doppel fights from Valhalla, with force shields, without HOCs
Data sim distances#
Bullets have travel time, so if you want the fastest data times possible you'll want your dolls as close to it as possible. If you're wondering exactly how much of a difference it makes, here's the travel times for each position:
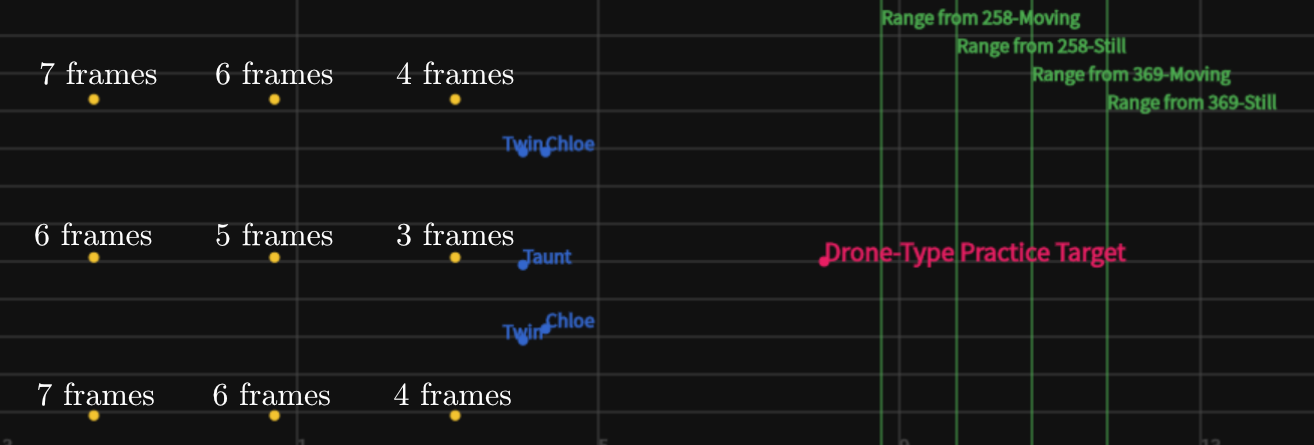
Of course, numbers will vary in non-datasim contexts where enemies don't always stand in that exact position. See also: Data Simulation formations, times, and mechanics.
Rows & Columns#
Consistency? Who needs that?
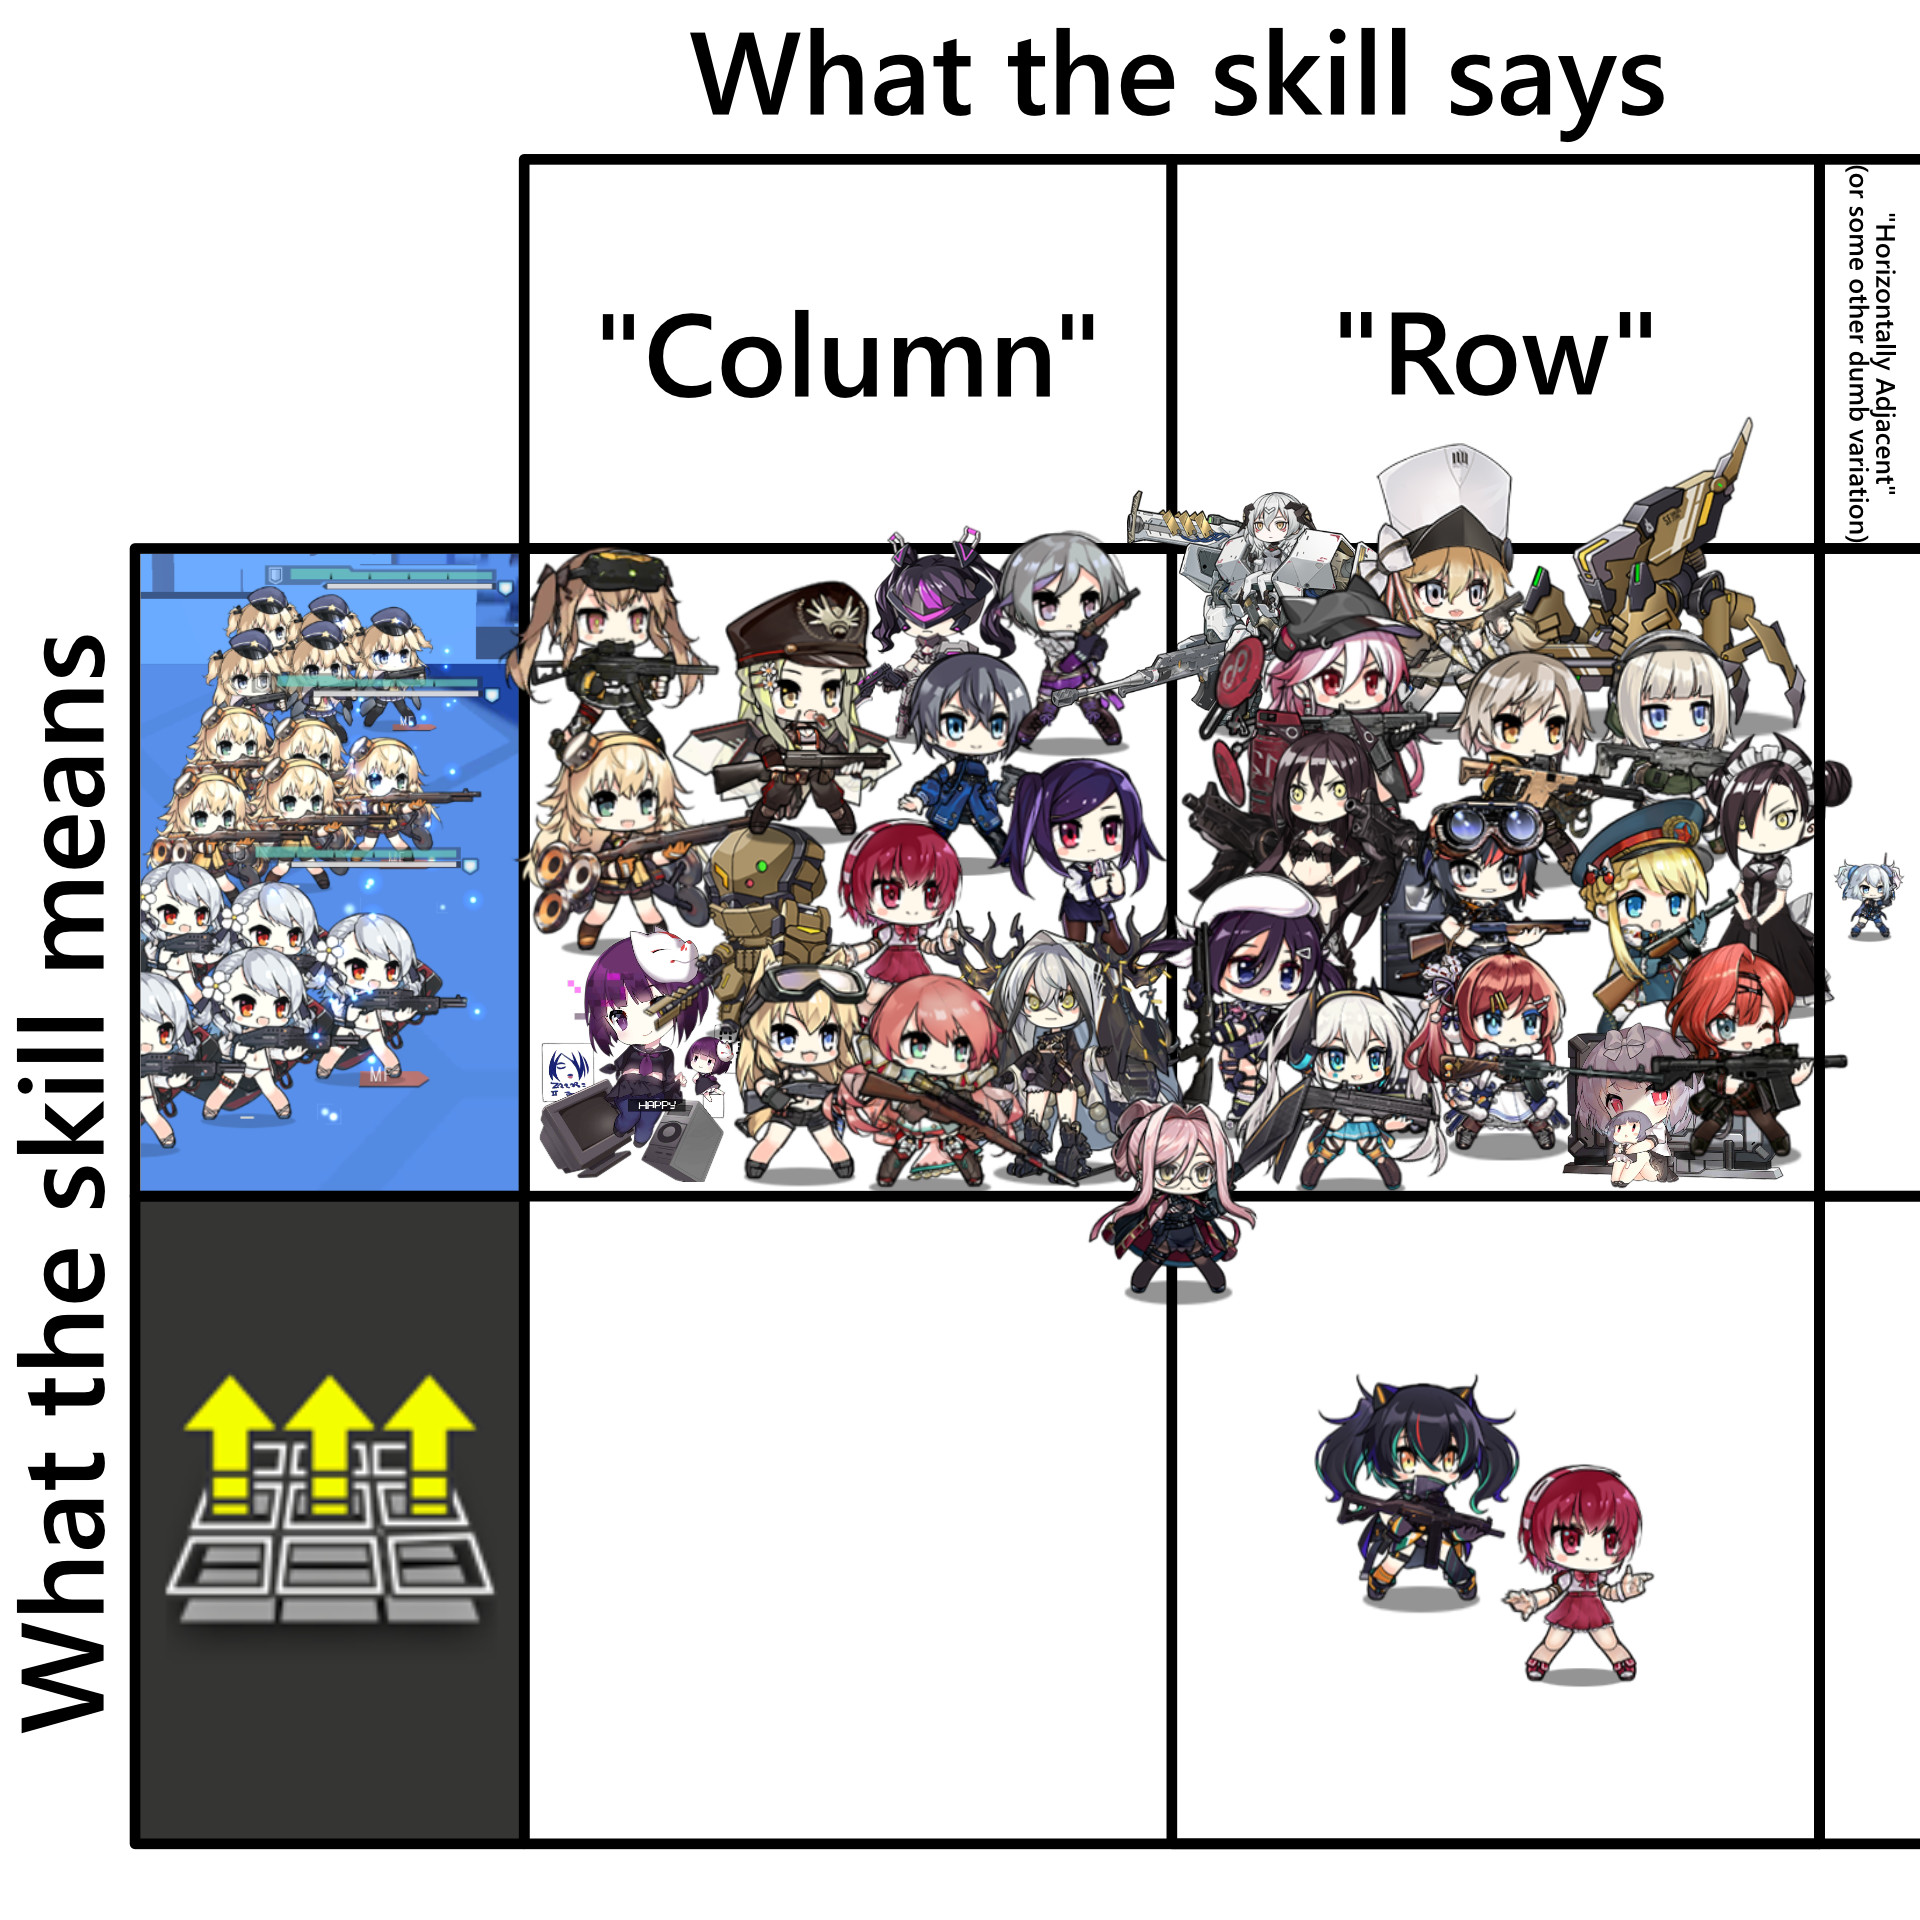
"Row" and "column" are used interchangeably, and both almost always refer to the thing that goes up and down on your screen (side to side for your dolls). Older dolls tend to say column, newer dolls tend to say row (but not always!).
Calibration#
Some observations on equipment calibration:
- Generally, each calibration will either keep the overall stat calibration the same (by redistributing), or cause a net stat increase.
- On the sixth calibration, and every ten after, you are guaranteed to get a stat increase.
- There is no hard pity threshold, but as you're likely to get within 1 of the end by the 16th calibration, most equipment will be finished at that point.
You can check your equip_info.csv file to see indications of this, or try counting as you calibrate.
Damage Variance Distribution#
The final damage dealt by most attacks in this game varies by 15%. This damage variation appears to be uniformly distributed:
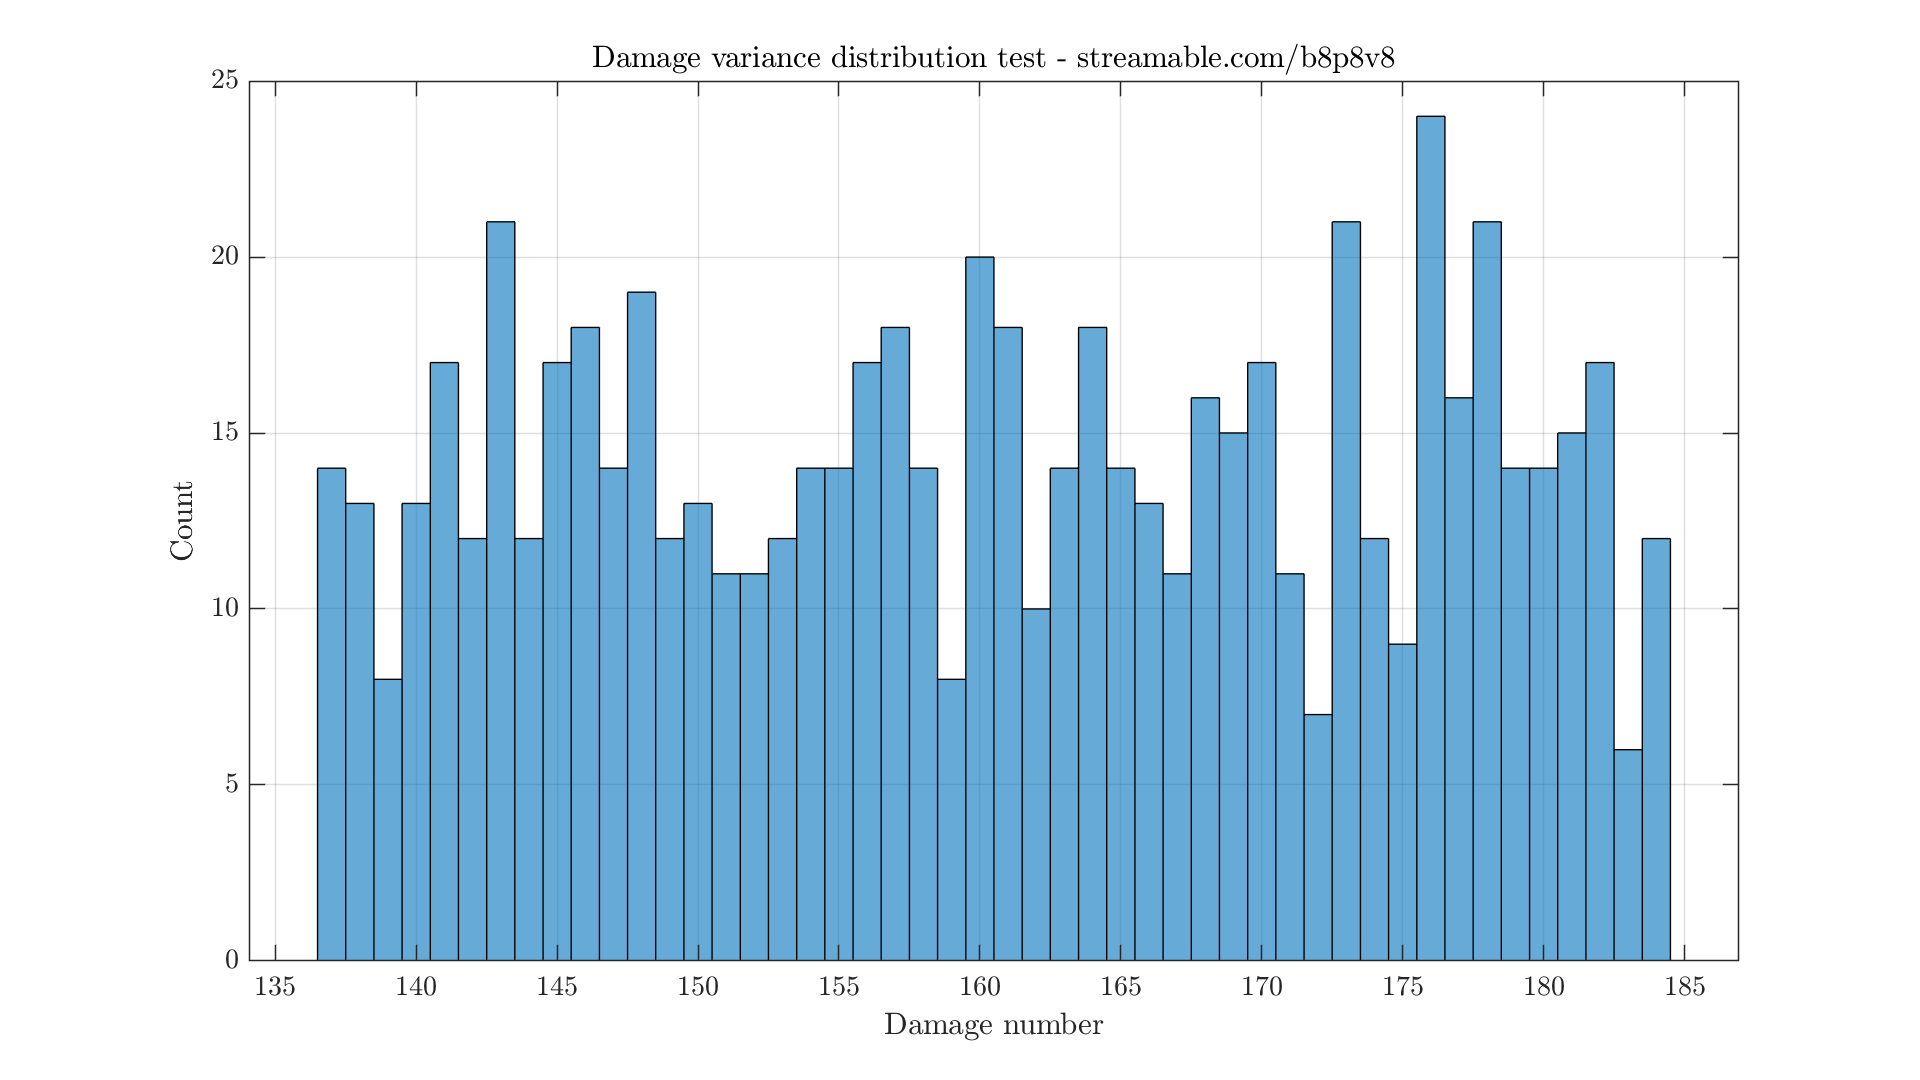
So any value in the 0.85-1.15 range is equally likely. Video source.